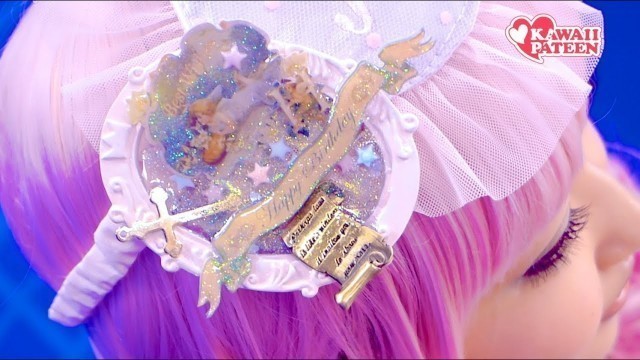

'KAWAII♥PATEEN SKILL-UP #17 Kawaii Deco Hair clip Accessory CRAFT TUTORIAL by designer KIMURA U by KOKOkim fashion designer Kimura U - ヘアアクセサリー作り方講座 - U Kimura now takes a new creative challenge : Making a hair accessory from scratch! For even more fun, just check the following videos with Kimura U : Naruto\'s Sasuke cosplay makeup : https://www.youtube.com/watch?v=QwEGUzhRZdM Attack on Titan\'s female Titan makeup : https://www.youtube.com/watch?v=Eg5Z1FBNUqk — Tokyo Street Fashion KAWAII♥PATEEN _Have fun with Fashion!_ Everything kawaii, Street fashion snaps, makeup tutorials and reports on fashion events in TOKYO!! On Facebook with tons of photos : https://www.facebook.com/Tokyo.Street.Fashion.KAWAII.PATEEN Official site : http://waoryu.jp ---------------- Hello everyone. I am Kimura U, the pinkest creator in the universe. Today I will make hair accessory made of UV resin. I will make hair accessory using real snacks. Let’s try. Voila! Using this clear file, I will create the sheet to make the resin. Make sure it will fit in this curing unit. When using the resin, everything will be done on this sheet. Under this space we will put masking tape. By putting this masking tape, the resin will not spill over. Apply it so some of the tape will stick out. This will make it easy for you to take the tape off at the end. Let’s start adding resin. The first step is making the bottom layer of resin. Don’t put too much in. Once the resin poured in, use this hair pin to smash the bubbles. If you don’t take care of each bubbles, the bubbles will remain when the resin becomes solid. Now the curing unit. Swtich on. 2 minutes now. It’s rock solid. Now let’s put the cute part into each places. Even paper stickers will become solid when you use resin. This is a real sugar candy, but with resin, this will become solid as well. Once you make it solid, it will last for years. I like pastel colors so I’m going to put in pastel colored stars. Again, we add some resin. To make it shiny, let’s add some glitter. Again, into the curing unit. Start! Wait 2minutes. Voila. It’s solid. From here, we add more layers and more resin. cute. Voila. Set the timer and On! I left it for 4minutes so let’s take it out now. Voila. Adding some more glitter. UV resin should not be added all at once but added few times to make many layers. Voila. Here is how it looks. Let’s take off the masking tape. Here we go. whoops. Oh no.. For people who doesn’t like this, add resin to the back. This will cover the remaining tape. Add glitter here. Done! A cute piece is made. To make it into an accessory, let’s put a pin. Use a glue gun and a triangular pin. Here we have a dreamy hair accessory which matches with pastel colors. I often use frames in gold, but since I’m the pinkest creator in the universe, I looked all over to find this pink ceramic frame not necessarily for resin. Not only to make a normal resin accessory, the key was to add edible real sugar candy in pastel color. Everybody please try. Bye bye. SAINARI.'
Tags: fashion , how to , Design , tutorial , cosmetics , lipstick , makeup , handmade , craft , foundation , lecture , creative , deco , tokyo , fashion design (industry) , japan , how-to , stylist , harajuku , 메이크업 , lolita , decora , kawaii , Makeup Artist (Film Company Role Or Service) , メイク , eyelashes , 可愛い , 코스프레 , harajuku fashion walk , tokyo fashion , 講座 , メイク講座 , 101 , kera , 変身 , 귀엽다 , アクセサリー , ロリータ , 木村優 , styliste , hair accessory , kokokim , kimura u , ヘアアクセ , アクセ
See also:


comments